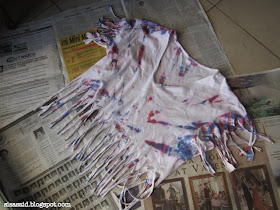
A few days ago, I posted about this cut-out shirt I made. Finally found time to make the tutorial.
Let's do this!
I have experimented with cut out shirts and dip-dying before and I just loved how they turned out. This time around, I tried something different with the dyeing process. As mentioned before, I got the inspiration for this project here.
Here's how you can make your own DIY Tie-dye fringe cut-out shirt.
I didn't want the shirt to have tie dye design that was too overwhelming. I researched on dying techniques (there are lots and I'd love to try each one) and I chose this one.
All you need to do is scrunch up the shirt like a spiral. This can be managed by holding the middle and twisting the shirt around. Add rubber bands to hold this in place, the more, the better!
Fabric dyes can be found in any bookstore for dirt cheap and are relatively easy to use. The powder dyes are dissolved in boiling water and are then ready to use. The dyes are then put in the squeeze bottle for easy application.
Time to get dirty! Apply the dye in the squeeze bottle on the shirt. Be generous! I did one color at a time. Keep the shirt overnight, and then rinse (or follow whatever instructions are given by the fabric dye). Annnddd, this is the design I got:
The cut-outs are so easy to do. As you can see, I just cut out the edges of the sleeves and the bottom of the shirt.
And, here it is!
More photos of this on my outfit post here.
What do you think? Like?


Cool, i am loving your style, this guide is really helpful when you want to create something new and unique, simply perfect.
ReplyDeleteThanks, Marty! I'm glad you like it. :)
Delete